Wednesday, August 26, 2009
Pie Crust! ...and the blueberry pie it holds
So it seems that everyone I know has an opinion about pie crust. Either you don't make it, because it appears to be out of your league, or you do make it and you have a recipe you swear by and usually it involves shortening and vinegar. Most people who use shortening say it makes the dough easier to handle. Sorry, but I'm gonna have to disspell the myths. There are exceptions, but usually, the simplest recipe is the best recipe and in this case, it's true. Give this a try and tell me if this crust doesn't taste better and take less sweat and tears than your average pie crust recipe. Incidentally, it's all natural too, because butter doesn't have all of those nasty hydrogenated oils. :)
This recipe is adapted from the New Betty Crocker Cookbook's two crust recipe. You can halve it if you need only one crust.
2/3 c. plus 1T. butter
2 c. flour (bread flour works best)
1/2 t. salt
4-6 T. cold water
extra flour for rolling
First, add flour and salt to a medium sized mixing bowl. Stir. Then, cut up the sticks of butter into little cubes with a butter knife. Add to the flour mix and use a pastry cutter to cut the butter into the flour. Keep at it until the mixture looks like small crumbs. (A pastry cutter is basically just a handle with metal hoops attached. If you don't have one, you can criss cross two knives to accomplish the same thing.)
Next, add the cold water one tablespoon at a time, mixing with a fork after each addition. When the mixture pulls cleanly away from the bowl, you've got enough water. Pick the dough up into your hands and press it into two round discs. If it's dry and crumbly still, add more water before separating.
Roll each disc out on a generously floured surface until it's about 1/8" thick, or about 2-3 inches wider than the pie pan you will put it in. Remember to flour your rolling pin and the top of the dough, so it doesn't get too sticky. This is really easy to work with, so you shouldn't have any trouble with it falling apart if you've floured well.
Next, gently fold the rolled dough into quarters and place it in the pie plate with the point at roughly the center of the plate. Unfold the dough into the plate and trim the dough to be hang over the edge by about 1/2-1" to make for easy sealing later.
Roll out the second crust the same way, still being careful to flour generously and let it rest while you prep the filling*.
*Blueberry Pie Recipe from Betty Crocker
3/4 c. sugar
1/2 c. flour
1/2 t. ground cinnamon, opt.
6 c. blueberries (fresh is best)
1 T. lemon juice
1 T. butter
Heat oven to 425 and mix first 4 ingredients in a large bowl. Pour into prepared pie crust. Sprinkle with lemon juice and dot with butter.
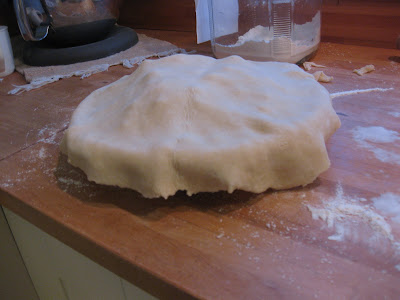
Then, fold the second crust into quarters and place it on top of the filling and first crust. Trim edges so the crust is only a tad bit longer than the bottom crust. Fold the edge of the top crust under the edge of the bottom crust and press gently together to seal the edge. Do this around the edge of the pie until it's completely sealed. Cut some slits into the top crust to vent the pie. Then, if you really feel ambitious you can flute the edge, which will wow your friends and fam with little effort on your part. Check out the picture if you want to see and easy way to do it.
Put some foil or crust covers around the edge and pop it into the oven. It should be done in about 35-45 minutes. If you can wait, let it cool off before cutting into it. We usually settle for runny pie and eat it when it's hot, but if you wait, it should set and keep it's shape nicely when you cut it. Enjoy!!
Sunday, August 9, 2009
Veggie Pizza
So admittedly, this dish is a little trashy, but in a good way. You know, it's one of those foods that you should be too sophisticated to like, but you just can't help yourself. Kind of like Velveeta and Rotel. Yum.
I learned this recipe (which is really more of a technique) from my friend Dawn. We taught together in the Netherlands and bonded over our midwestern roots. Dawn hails from Wisconsin and I am Minnesota born. We have a healthy appreciation for Jello salad and the like.
So here's what you do. Buy a can of crescent roll dough. (I know-- how many great midwestern recipes start with that step?) Spread the dough out in a single layer on a cookie sheet. Make sure that it is one giant rectangle. You may have to press the seams together. Bake it for 8-10 minutes or until it's golden brown on the bottom.
Mix a package of cream cheese with a packet of italian (or ranch) salad dressing seasoning. (I told you this was trashy!!) Thin the cheese mixture out with milk or plain yoghurt until it is spreadable.
Once the crust has cooled, "ice" it with about 2/3 of the cheese mixture. Save the rest of crackers or bagels or fingers or.....
Arrange your favorite cut fresh veggies on top of the cheese. (cherry tomatoes, sliced mushrooms, scallions, shredded carrot) Use what you like. We had some artichokes on hand tonight so we used those, too.
Cut up into pretty pieces. This is trashy food, but it's attractive (and tasty) trashy food.
Do you have any favorite trashy foods? Feel free to share in the comments!
Katie
Roast Beef Summer Rolls
I recently got a subscription to Food & Wine magazine. Ok, so I subscribed some time in May, but my first issue came in the mail yesterday. I immediately started flipping through the pages and came across an intriguing recipe for summer rolls made with deli-sliced roast beef. I had nearly everything else on hand (including the rice paper wrappers), so I added the beef to my shopping list and planned on making these for a simple Sunday supper.
I put these together with my mother. I recommend that you have a helper also! The sauce and filling come together quickly, but the actual rolling takes some practice and patience. I would roll them more tightly next time.
You can find the original recipe here. What I am printing includes my notes and modifications.
INGREDIENTS
- 1 large garlic clove, smashed (or finely diced)
- 1 1/2 tablespoons light brown sugar
- 1 teaspoon Thai green curry paste (I used red and it was delicious. Use what you have on hand.)
- 2 tablespoons fresh lime juice
- 2 tablespoons Asian fish sauce (mmmm..... stinky deliciousness!)
- 1/4 cup chopped cilantro (I used flat leaf parsley)
- 1/4 cup chopped mint
- 1/3 cup mayonnaise (low-fat or fat free work fine here)
- 4 cups coleslaw mix ( I bought the really fine kind with no carrots, so I added a quarter cup of finely shredded carrot)
- 1/2 pound rare deli roast beef, thinly sliced and cut into 1/2-inch strips (use GOOD roast beef. Not the cheap stuff.)
- 24 six-inch-round rice paper wrappers, plus more in case of breakage (mine were bigger, so we only got half as many.)
DIRECTIONS
- Mix the garlic together with the chili paste and brown sugar. Add the lime juice, fish sauce and 3 tablespoons of water. Stir in half of the cilantro and mint. In a small bowl, whisk the mayonnaise with 1 tablespoon of the green curry dipping sauce.
- In a large bowl, toss the coleslaw mix with the roast beef and the remaining cilantro and mint.
- Fill a pie plate with warm water. Dip one wrapper into the warm water and let it soften. Lift it out onto a cutting board covered in plastic wrap. Let it sit a few second before filling and rolling. Spread a scant teaspoon of the curry mayonnaise on the bottom third of each wrapper and top with a scant 3 tablespoons of the roast beef filling. (amounts are totally approximate. Do what looks right. Roll the wrappers into tight cylinders, tucking in the sides as you go. Transfer the rolls to a plastic wrap–lined baking sheet and repeat with the remaining wrappers, curry mayonnaise and filling.
- Just before serving, cut each roll in half and serve with the dipping sauce.
Enjoy them! (we did!!!)
Katie
Subscribe to:
Posts (Atom)